Adding a Bass Shaker to the Typhoon Bolt Gaming Chair: A DIY Guide
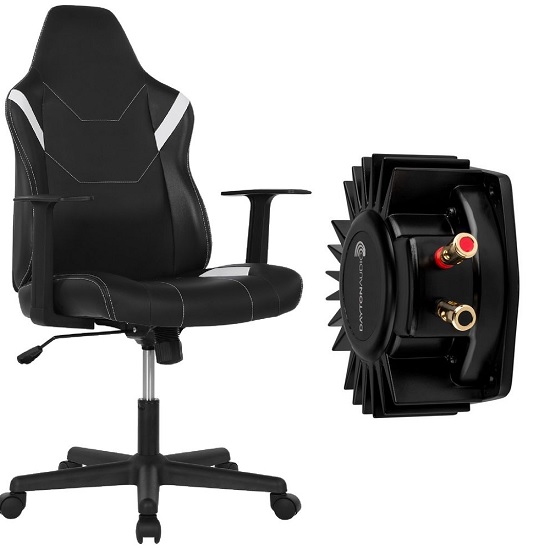
The Typhoon Bolt Gaming Chair is a budget‑friendly entry‑level option that offers decent comfort and a stylish leatherette finish for short gaming sessions. While it’s designed for 1‑3 hours of use and isn’t built for heavy daily wear, its solid steel frame makes it an ideal platform for a DIY bass shaker upgrade.
Adding a tactile transducer transforms the chair into an immersive haptic seat, delivering low‑frequency vibrations that sync with in‑game explosions, engine roars and impacts.
Typhoon Bolt Overview
The Typhoon Bolt costs around $99 at Officeworks and features a steel frame with leatherette upholstery, a gas‑lift height adjustment and a tilt mechanism. Assembly takes roughly 30 minutes with straightforward instructions and while it’s comfortable for short sessions, it isn’t designed for long‑term heavy use.
- Price: Approximately $99 (Officeworks)
- Construction: Steel frame with leatherette upholstery, gas‑lift height adjustment, tilt mechanism
- Assembly: Roughly 30 minutes, straightforward instructions
- Comfort: Suitable for short sessions; not intended for long‑term heavy use
Bass Shaker Compatibility
The chair’s simple, cost‑effective base and sturdy metal frame provide a reliable mounting surface for small bass shakers such as the Dayton Audio BST‑1. Although the shaker isn’t a factory feature, the frame can accommodate a transducer with either screws or heavy‑duty zip ties, ensuring direct contact with the metal for optimal vibration transfer.
Required Components
The system requires a bass shaker (transducer), such as the Dayton Audio BST‑1, which can be sourced from Campad Electronics; an amplifier, for example the Nobsound G2 PRO 100W sub amp, available on Amazon AU; mounting hardware including bolts, nylon lock nuts and metal plates, obtainable at a local hardware store; an audio cable, either a 3.5mm to stereo RCA or RCA‑to‑RCA cable, found at any electronics retailer; and optionally, rubber washers for noise damping, which can also be purchased at a hardware store.
| Component | Example | Where to Find |
|---|---|---|
| Bass Shaker (transducer) | Dayton Audio BST‑1 | Campad Electronics |
| Amplifier | Nobsound G2 PRO (100W sub amp) | Amazon AU |
| Mounting hardware | Bolts, nylon lock nuts, metal plates | Local hardware store |
| Audio cable | 3.5 mm → Stereo RCA (or RCA‑to‑RCA) | Any electronics retailer |
| Optional | Rubber washers for noise damping | Any hardware store |
Installation Steps & Tips
1. Select Mounting Location
- Position the shaker under the seat base, attaching directly to the steel frame rather than the wood or plastic covering. This ensures maximum vibration transmission to the user’s body.
2. Prepare the Mounting Surface
- If the frame lacks convenient screw holes, drill a small pilot hole or use a thin HDPE/wood plate as a bridge between the shaker and the metal.
3. Secure the Shaker
- Preferred method: self‑tapping screws with nylon lock nuts.
- Alternative: high‑strength zip ties wrapped tightly around the frame and shaker.
- Ensure the shaker sits flush against the metal; avoid foam or thick padding that can isolate vibrations.
4. Add Locking Measures
- Use nylon lock nuts or apply a thread‑locking compound to prevent the screws from loosening under constant vibration.
- Rubber washers can be added under the mounting plate to dampen harsh metal‑on‑metal noise.
5. Route the Power Cable
- Run the shaker’s power lead along the chair’s underside, leaving sufficient slack for recline and tilt movements.
- Secure the cable with zip ties or cable clips, avoiding any sharp bends that could damage the wire.
6. Tighten Existing Bolts
- Before powering up, tighten all factory bolts on the chair to reduce rattling caused by added vibration.
Connecting the Nobsound G2 PRO Amplifier
1. Cable Selection
- Use a 3.5 mm → Stereo RCA cable for PC or console headphone‑jack connections.
- If a DAC or external audio interface is used, connect its RCA outputs directly to the amp’s “AUDIO IN” ports.
2. Plug‑In
- Insert the 3.5mm plug into the PC/console headphone jack.
- Connect the red and white RCA plugs to the corresponding “AUDIO IN” jacks on the G2 PRO.
3. Amp Settings
- Set the mode switch to PBTL for full‑frequency operation or SUB for dedicated sub‑woofer output, depending on the desired haptic effect.
4. Power Up
- Connect the amp to mains, power on and adjust volume to a comfortable level.
Rattle Mitigation
- Tighten All Fasteners: Ensure every factory screw and bolt on the chair is snug before installing the shaker.
- Rubber Washers: Place under mounting screws to absorb high‑frequency metal‑on‑metal contact.
- Cable Management: Keep power and audio cables away from moving parts; use flexible cable sleeves to prevent pulling.
Verdict
Integrating a bass shaker into the Typhoon Bolt elevates a modest, budget‑friendly chair into a tactile gaming platform that rivals far more expensive haptic‑enabled seats.
The steel frame efficiently transfers low‑frequency energy from a modest transducer and a 100W sub‑amp, delivering noticeable vibrations without the need for a separate subwoofer.
Coupled with software such as SimHub for custom feedback profiles, the upgraded chair provides a multi‑sensory experience that enhances spatial awareness and immersion while preserving the original affordability and straightforward assembly of the Typhoon Bolt.
Disclaimer: Modifying the chair by drilling holes may void the warranty of your Typhoon Bolt chair.
FAQs
Which bass shaker model works best with the Typhoon Bolt?
The Dayton Audio BST‑1 is a compact, 2‑inch transducer that fits easily under the seat and provides sufficient low‑frequency output for a budget chair.
Can I use a different amplifier than the Nobsound G2 PRO?
Any 2‑channel amplifier rated for 50W RMS or higher per channel and with RCA inputs will work, provided it can drive the shaker’s impedance (typically 4Ω).
Do I have to drill holes in the chair frame?
Drilling is optional; you can mount the shaker with self‑tapping screws into existing metal slots, use a thin mounting plate, or secure it with high‑strength zip ties.
Will adding a shaker void the Typhoon Bolt warranty?
Modifying the chair by drilling or permanently altering the frame may void the manufacturer’s warranty. Use non‑destructive mounting methods if warranty preservation is a priority.
How do I prevent the chair from rattling after installation?
Tighten all factory bolts, add rubber or silicone washers under mounting screws, and route cables away from moving parts. Applying thread‑locking compound to screws also helps.
Which audio source connection gives the best results?
A 3.5 mm → Stereo RCA cable from the PC or console headphone jack is simplest. For higher fidelity, connect a dedicated DAC or audio interface directly to the amp’s RCA inputs.
Should the amp be set to PBTL or SUB mode?
Use PBTL for full‑range vibration (both channels driven in parallel) when you want the shaker to respond to all low‑frequency content. Switch to SUB if you prefer a dedicated sub‑woofer output that may emphasize deeper bass cues.
Is any additional software required?
No, the shaker will react to any audio signal sent to the amp. For game‑specific haptic feedback, software such as SimHub or Razer Surround can map in‑game events to the audio output.
How much power should I set on the amplifier?
Start with the volume knob at a low setting (≈10‑15% of max) and increase gradually until the vibration is noticeable but comfortable. Avoid maxing out the amp to prevent overheating the shaker.
Will the added shaker affect the chair’s height adjustment or tilt?
Proper cable routing with slack and flexible zip ties ensures the power lead does not restrict the gas‑lift or tilt mechanisms. Verify movement after installation before securing all fasteners.